Sunday, November 28, 2010

My First Oven-Baked Bread for Thanksgiving

My First Oven-Baked Bread for Thanksgiving: "

This was my first time to use oven to bake bread (before used bread machine). I had been wanting to try the no-knead bread receipe since it came out in 2006.


I followed the original receipe but tuned it to suit my case. Since my order of the digital scale hasn't arrived, I could only use volume to measure the quantities:


  • 3 Cup flour (2 AP + 1 WW)

  • 1 5/8 tsp salt

  • 3/8 tsp active dry yeast (direct into the mix)

  • 1 5/8 Cup filtered water


After mixing, it looked pretty sloppy.


Then went back to look at the video and realized that it's 1 1/2C water used in the video. This dough was way too wet. Anyway, I still continued the process. Atfer two hours at room temperature, I put the dough (inside a plastic bag) into the fridge.


Here are a series of photos of the long cold-fermentation process.


With another hour at room temperature (total 58.5 hr), I streched and folded the dough. It's so wet that even with plenty flour it's very difficult to handle the dough.


I let it sit for 15 min and then transferred it onto a kitchen towel with flour & cornmeals. Covered for 2.5 hr for the 2nd rise. The dough did rise quite a lot (but in a flat round shape).


When I tried to put it into the big stainless stew pot (preheated in the oven at 500F), I couldn't let it slide into the pot. The dough was so wet that it sticked to the towel. I tried to use the chopping mat but it still sticked to that. In the end, I had to scrabed the dough down.


I was worried that this might delate the dough quite a lot. But when I removed the cover after 30min, I noticed the bread was all right. So happy that I forgot to lower the oven temperature to 450 until 8 min later. I let it baked at 450 for another 8 min before took the bread out.


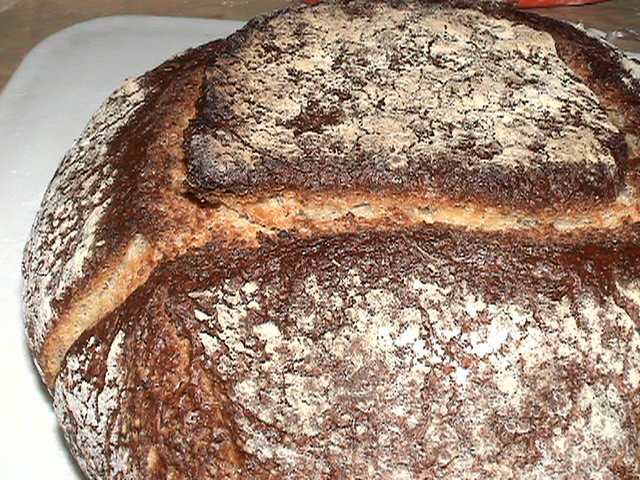
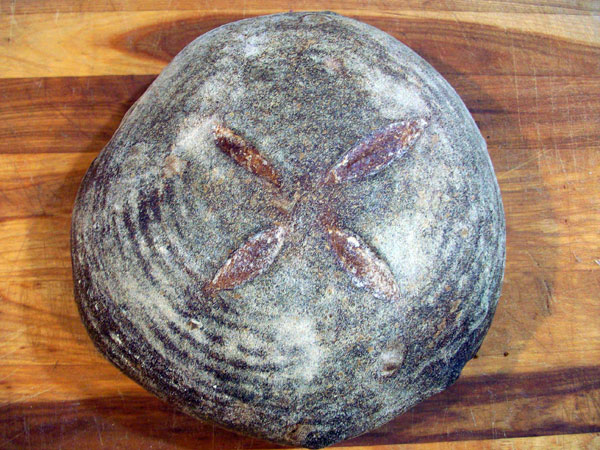
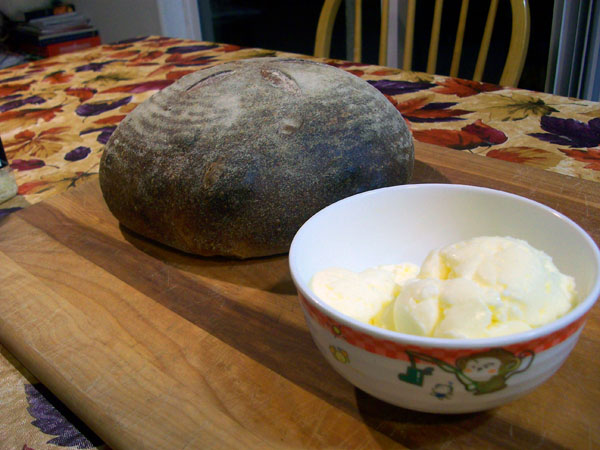
It looked not bad right? Initially I shaped it into a round 'disk' (it's too soft to be shaped into a ball), but it became oval when I tried very hard to let it slide into the pot. I even slashed the dough but it's all gone during that process.


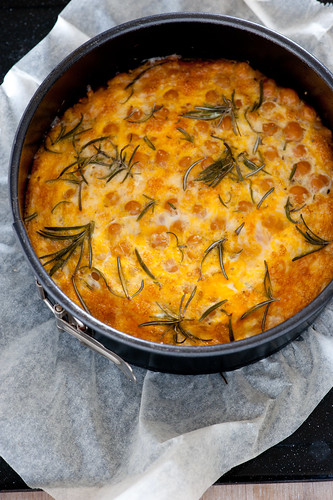
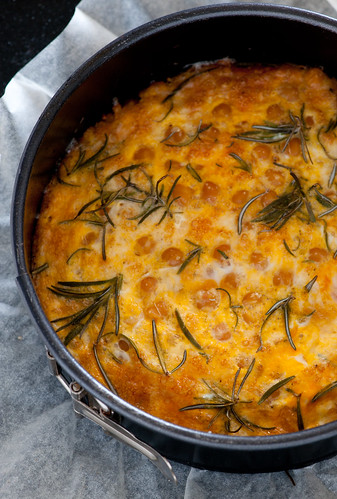
Look at this caramalized crust!


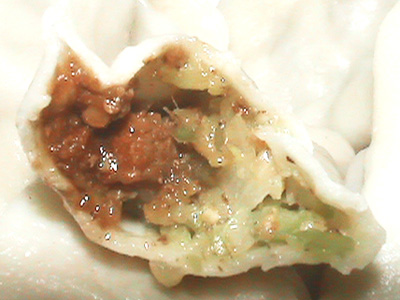
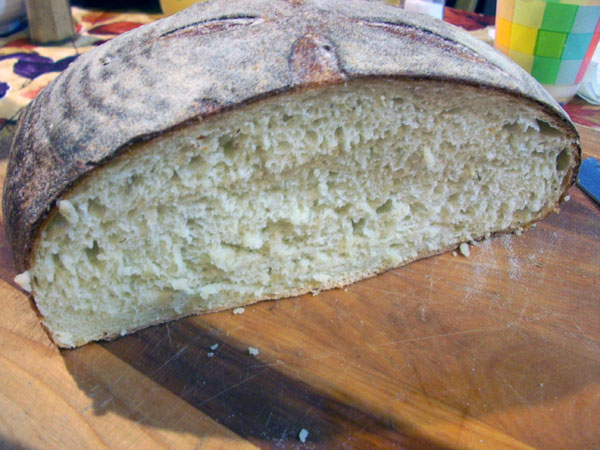
I brought this bread for the Thanksgiving dinner at my supervisor's house. I had the honor to cut my bread and took the picture.


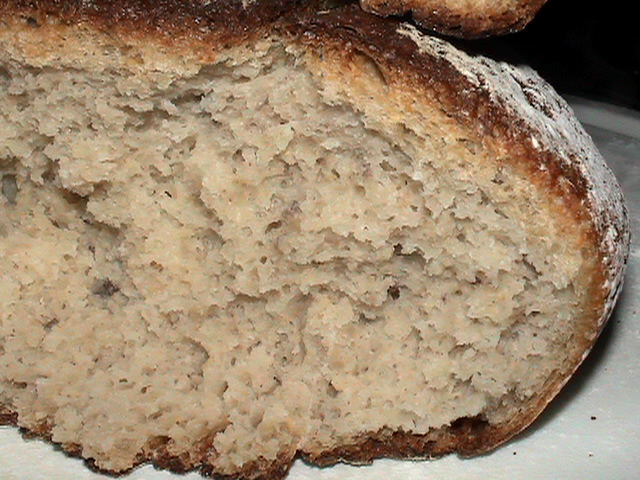
When I saw the crumb like that, I knew it's going to be good. And indeed, it's very chewy inside! I was very proud of my bread. Well, for a newbie, this was a big success.


If I didn't have the trouble of sliding this extremely wet dough into the pot, the bread would likely rise higher than the above.


I estimate the hydration in my dough was around 90%, much higher than Mark Bittman's in his later note (80%). Next time I would definitely lower the water amount. I would like to try no-knead bageutte. :-)

"

The water fried Chashao vegitable dumpling, water boiled Chashao dumpling, millet ferment full wheat pot bread

The water fried Chashao vegitable dumpling, water boiled Chashao dumpling, millet ferment full wheat pot bread: "


Hello TFL loafer:


I'm glad to come here as a new mumber. I'm a new baker. I just start baking western bread from 1 month ago. I find here 2 weeks ago when I want to find pot bread. I like here many charming bread. And I'm very interesting with here Tartine bread pot experiment now! Thanks for information about baking bread. Thanks for this website organizer.


I want to take dumpling in this weekend. So I buy pork and celery. Daisy_A ask me if I know char siu bao. I know this South China bread from my tongue. I been take this in restaurant when I stay in Guangdong. The char siu pork is my favate dish in Guangzhou. But here Beijng no many char siu. I been try to baking this pork last month. It's not same with restaurant. But already ok. Package,pack, bundle; packet; parcel;bag; yurt all call "Bao" in China. char siu bao is wheat flour parceled with char siu pork. Many people no take lunch and dinner in Guangdong. They like to take morning tea with small cake and midnight snack with big dish in restaurant. So Guangdong have many delicate snack. char siu bao so popular and came from Guangdong. So normally char siu bao meaning Guangdong style char siu bao.


I search in net. If I want making it samilar with restaurant. I need making a along time raising sourdough. But I want take now(#^.^#). So After 1 day waitting for pork saltd. I finishd char siu baking. I start to making char siu dumplng. Dumplng dough no need yeast. So I can get quickly. I already have char siu now. So I will making Guangdong char siu soon. And now this my style char siu bao(char siu dumpling)


BBQ sauce:


Soybean sauce 2 T(30ML)*,


Red colour preserved beancurd 1 piece,


Sugar 45G*,


Five-spice powder 1/2 t(2.5ML),


garlic chopped 5G,


Cooking rice wine 1T(15ML),


oyster sauce1T(15ML)*,


Red rice or preserved beancurd sauce 1T(15ML)(optional)


meat:pork 250g


brushing liquide:Maltose(or honey) 30g,water 30ML


Dough: 250g all porpose flour 125g water 2g salt 1 egg white


For I pan fried dumpling: 100g water 10G all porpose flour mix


I also use my electric cooker aluminous pot baking my pot bread. This bread I use many DIY material: I use millet rose ferment(I made in 1 week ago) mix with soy bean and ginkgo dregs(residue from beans after I making tofu) and full wheat (11/3cup all purpose wheate 11/3 cup whole wheat no bran and 1.5 cup whole wheat with bran ) 80G 100% yeast(20g all porpose flour 20g whole wheat flour). I use about 350Ml wine and 50 water. ferment and bean dregs all wet. So my dough more than 80% water flour I think. And in room 14 degree 12 hours it's already big up. I think maybe from my wine. I take it out room. It's already cold enough outside. About 33 hour later. It's more big. I take back room in 14 degree. After I finish my Chashao Bao lunch. I remember my big bread. It's already very big and sticky.So I preheat my oven with pot in 200 degree in 10 minutes. After I take dough to hot pot close lid 250 degree 20 minutes. after I take the lid away, 20 minutes 210 degree. After I take pot over and move bread 10 minutes again. After I turn the bread top down. top heat 200 degree open 10 minutes. After stop I open the oven door. Not so happy feeling. so I open oven 200 degree 10 minutes again. After really stop,I open oven waitting about 5 minutes. I take the bread out. And quickly open it. The time from I start his dough already 48 hours.


Thank you for your reading


"

Wednesday, November 24, 2010

Happy Thanksgiving Wishes: A Deviled Eggs Recipe Martha Stewart would Love

Happy Thanksgiving Wishes: A Deviled Eggs Recipe Martha Stewart would Love: "

Many may not think of it as traditional but I love having deviled eggs for a Thanksgiving appetizer. I know, you may automatically think of deviled eggs as a summer recipe but this time of year is actually ideal as you do not need to worry about the ’stayed out in the heat too long’ problem.


The deviled egg recipe below is so good that Martha Stewart would be proud to serve it on Thanksgiving Day…


6 large eggs

2 tablespoons reduced fat mayonnaise

1/2 celery stalk, minced

1 teaspoon Old Bay Seasoning

1/2 teaspoon Dijon mustard

2 to 3 tablespoons milk

Ground pepper


Directions

1.PLace eggs in a large pot and cover with cold water by 2 inches. Bring to a boil for 1 minute and then remove from heat, cover, and let sit 10 minutes.


Drain water and then run fresh cold water over the eggs until cool enough to hold. Peel the eggs and then slice each egg in half lengthwise.


Remove the egg yolks and place in a small bowl and mash. Add mayonnaise, celery, Old Bay, and mustard and mash until smooth. Add milk, one tablespoon at a time while stirring, until mixture is creamy.


Season mixture with pepper and then fill each egg white with about 1 tablespoon yolk mixture. Dust with a dash of Paprika or minced scallions if yo uwish.

"

Thanksgiving Desserts: Apple Pie with Cranberries

Thanksgiving Desserts: Apple Pie with Cranberries: "

apple pie, thanksgiving dessertsMy niece and I made this pie recently – this summer, actually, when raspberries were abundant in the back yard and she suggested their tartness might go well in an apple pie. She was right. It turns out cranberries are as delicious a pairing in apple pie – and even better suited to the season. It’s now one of our favorite Thanksgiving desserts.


This is a simple recipe – my 12 year old niece did most of it herself. Remember that when making an apple pie the fruit shrinks considerably, so don’t be afraid to pile it high. After placing the top crust on our pie, we cut slits to allow steam to escape – and because her mom (my sister) is a math teacher, we cut them in the math symbol for pi.


Apple Pie with Cranberries


pastry for a double crust pie


6-8 apples, peeled and sliced

3/4 cup sugar

2 Tbsp. flour

pinch salt

1-2 cups fresh cranberries (if you use frozen, don’t thaw them)


Preheat the oven to 450F. Line a 9-inch pie plate with pastry, fitting it in without stretching it – let the edges hang over the side.


Slice the apples into a large bowl. In a small bowl, stir together the sugar, flour and salt; add to the apples and toss them together. Pile them into the pastry, dumping any sugar left in the bottom of the bowl overtop. Scatter cranberries overtop.


Roll out the remaining pastry and place it over the pie; trim the edges (both layers) to about 1/2-inch past the edge of the pie plate. Tuck and crimp however you like, using your fingers or the tines of a fork. Cut a few slits in the top to allow steam to escape. If you like, brush the top with milk or cream, and if you like, sprinkle with a spoonful of sugar.


Bake the pie for 10 minutes, then reduce the heat to 350F and bake for another 45-50 minutes, until golden and juices are bubbling out through the slits. Cool on a wire rack.


Serves 8.

"

Monday, November 22, 2010

Raspberry Marshmallows

Raspberry Marshmallows: "


Your eyes are not fooling you… you are finally looking at a new post on Butter Sugar Flour. It has been 3 months since I last uploaded anything and I know that is a really poor effort. I’m sorry! Thanks to all those lovely readers who sent me emails of concern asking how I was and where I have been (lots of: “are you okay?” “is everything okay?” “ARE YOU STILL ALIVE?!”). I’ve had a rather rough start to 2010 and things are much better, but there is still a lot that needs to improve! I am staying as positive as I can though, which is the only way to be! :)


Since this is my first post for 2010, I might as well share a few of my goals for this year. I wouldn’t say they are new year’s resolutions, but just things to strive for. They aren’t listed in order of importance:


To get out of Australia…


I don’t mean permanently as I do love my hometown of Melbourne very much, but I do want to begin travelling internationally this year (although I haven’t ruled out moving abroad in the coming years). I haven’t been overseas since I was 10 years old and thirteen years is a very long time to stay in the confines of my island country! I need to explore this wonderful earth of ours, see the sights of the world, experience different cultures and just have some fun! I am actually considering a two month holiday in the coming months, to USA and Europe. Hopefully it works out!


Potential disasters in the kitchen…


I aim to be more experimental in terms of food and baking this year. I don’t mean really crazy and wacky flavour combinations, but more so trying out more and more recipes (especially from my big cookbook collection) and to not be afraid in trying something, even though it looks very difficult and daunting… At the moment I have a list as long as my arm of recipes I want to try. Just to name a few: rhubarb and blueberry jam, chai creme brulee tarts and lemon curd crepe cake – yum!


Looking through the viewfinder…


I really want to improve on my photography this year and really grow into a specific style. I want to be a better photographer, I want to know the complete ins and outs of my beast of a camera and I am just really keen to keep on learning about anything and everything related to digital photography: lighting, composition, workflow, post processing, flash work – all of it. I carry my camera everywhere with me now, and although it gives me a sore shoulder, I never miss out on a photo opportunity! I have also recently joined the Beyond Snapshots team as a photography intern/assistant and am really excited to see what I will be able to learn from this role. A portfolio is in the works this year too…


Blog, what blog?


This blog needs some attention! I want to update more often (and I will) and it is in dire need of a makeover which needs to be done ASAP! The theme you are looking at now was meant to be a temporary fix for only a few weeks whilst I worked with several web designers, but due to timing and “creative differences”, nothing ever happened. I considered hiring another web designer to help me change the blog, but I’ve decided to tackle it on my own. It’s time to get my geek on! Wish me luck!


I have a few other personal and career goals on my “let’s do it in 2010″ list, but I think they’d be pretty boring to share. What I will share with you is a recipe for raspberry marshmallows. It is the exact same recipe as the passionfruit marshmallows featured on this blog and are just as delicious. This recipe is so versatile, you could make any fruit-flavoured marshmallow you want, may strawberry, blueberry or peach. It is a foolproof recipe that I have made many, many times before.


Raspberry Marshmallows


300g raspberries


500g caster sugar


20g powdered gelatine


2 eggwhites


snow sugar, for dusting (Snow sugar is icing sugar with vegetable fat, cornflour and dextrose added to prevent the sugar from absorbing moisture and dissolving. Icing sugar/confectioner’s sugar is a suitable substitute if you can’t obtain snow sugar)


  1. Lightly grease and line a 17cm x 25cm shallow cake pan an dust base liberally with snow sugar.

  2. Place the raspberries in a small pan and cook over medium heat, smooshing them with a spatula. Cook until they fall apart, let cool and pass through a sieve. You should get around 200ml of puree. Combine the puree with gelatine in a bowl and set aside.

  3. Combine caster sugar and 1 cup water in a saucepan and coojk over low heat, stirring, until sugar dissolves, then increaseheat to medium and cook for 5-10 minutes or until syrup reaches 125C on a sugar thermometer. Remove from heat, add passionfruit mixture to syrup and stir until gelatine dissolves. Meanwhile, using an electric mixer, whisk eggwhites and a pinch of salt until frothy. Gradually add passionfruit mixture, whisking continuously on medium speed until mixture has doubled in size, then slowly decrease speed and mix until mixture is warm (about 40C). Pour into prepared cake pan, and using a lightly oiled spatula, spread evenly, then dust top liberally with snow sugar. Stand at room temperature for 3 hours or until firm. Using a sharp, serrated knife dusted with snow sugar, cut marshmallow into squares and roll in snow sugar to coat.


Store in an airtight container between sheets of baking paper at room temperature for up to two weeks.

"

whole wheat 1-2-3 sourdough

whole wheat 1-2-3 sourdough: "

Made the old standby again. I really love this bread. I have a question though. First, the recipe:


9 oz starter (100% hydration)


9 oz whole wheat flour


9 oz white flour


9 oz bread flour


18 oz water


1 T salt


I mixed it all in my KA for about 5 minutes, then did 2 stretch and folds over an hour. The dough was VERY wet so I folded in about 1/8 cup flour. It retarded overnight in the fridge, then one more stretch and fold, divide, preshape. Rest and rise for about an hour. Then shaped and pulled taut.


Cooked with steam in a 450 °F oven for 35-40 minutes. It had good oven spring, and looks GREAT.


Here is my question:


my bread is pretty flat before I put it in the oven. It doesn't hold its shape while rising. Maybe I shouldn't worry about it, but would slightly drier dough help here? my dough is very wet, but it usually tastes great. Any thoughts? I supposed I could rise it upside down in a towel-lined-flour-covered bowl or wicker basket. But I don't have 2...

"

Potato loaf and fresh butter

Potato loaf and fresh butter: "

I made a potato bread today, using Dan Lepard's recipe from The Art of Handmade Bread (AKA The Handmade Loaf) as the basis and tweaking it a bit. If memory serves me right, I used:


300 grams water


200 grams mashed potatoes


500 grams bread flour


1 tablespoon sourdough starter (cold from the fridge)


1 tablespoon honey


2 teaspoon salt


1 teaspoon instant yeast


I gave it quite a while, 10 minutes or so, in the mixer, then let it rise slowly most of the day, folding it a couple of times when I noticed it cresting over the edge of the bowl.. I shaped it an hour or so before I wanted to bake it, then baked it with steam at 465 for 15 minutes then 400 or so for another 20 to 30 minutes.


Potato Bread


Potato Bread


It has a relatively tight crumb but is really nice and soft. I'm thinking I may make this as rolls for my Thanksgiving day feast this year.


My kids and I also made fresh butter in Mason jars as discussed here.


Bread and butter


The kids had a blast dancing around the living room shaking the jars (we put some music on) and the butter was truly delicious. It is well worth the effort!

"

Simply Tomatoes Pasta

Simply Tomatoes Pasta: "We often like to complicate matters, and lose the simplicity of being...simple.


So here, no sardines, no mushrooms, no ground meat. No Bok Choy, no bell peppers, no greens beans. I serve you...simply tomatoes. The 'simply tomatoes' linguine - garlic and onions included, salt and pepper not forgotten.


Simply Tomatoes Linguine

Ingredients: 1 large tomato, diced; 4 cloves of garlic, finely minced; 1/2 a big onion, diced; sea salt and freshly ground black pepper to taste; cooked linguine (set side some boiling pasta liquid)


Directions: Heat olive oil in a pan. Add the onions, and fry briskly, then add the garlic and continue to fry till onions are slightly tender. Add in tomatoes, fry and simmer till tomato juice is released. Then lower the heat and continue to simmer till the tomatoes are soft and tender (almost disintegrated). Salt and pepper to taste. Add in linguine and toss well into the sauce, adding some pasta liquid if too dry.


The only other ingredient I can suggest to add, is some red pepper chili flakes or red chili powder to spice things up for Simply Tomatoes Spicy Linguine.


This dish is for , My Meatless Mondays and Hearth and Soul. It's pasta - so I can't forget Presto Pasta Nights hosted by Denise of Oh Taste n See.


What is the simplest pasta you have cooked?


Tag: , ,


An Escape to Food on Facebook
"

Chocolate Marshmallow Surprise Cookies

Chocolate Marshmallow Surprise Cookies: "'The best kind of prize is a surprise!' Can anyone guess from which book-turned-movie this quote is? Hint: It has to do with chocolate ... No? The answer is 'Charlie and the Chocolate Factory', one of my favorite books as a child. The cookies I baked today also involve a surprise and chocolate; they're chocolate cookies with a chocolate topping and a marshmallow surprise.


DSC01768


I never liked chocolate cookies before I started baking them myself. When you make them from scratch, the chocolate seems more intense and flavorful, plus it's really delicious to eat them when they're still warm. These cookies were lovely. The marshmallow surprise and chocolate topping sets them apart from the countless of other chocolate cookie recipes I've tried. Rating: 4 out of 5.


Surprise Cookies: Martha Stewart - Cookies

Ingredients: Makes 2 dozen
- 1 ¾ cups all-purpose flour
- ¾ cup cocoa powder
- ½ teaspoon baking soda
- ½ teaspoon salt
- ½ cup (1 stick) unsalted butter, softened
- 1 cup sugar
- 1 large egg
- ½ cup milk
- 1 teaspoon pure vanilla extract
- 12 large marshmallows, cut in half horizontally

- 1 cup confectioners' sugar
- 2 tablespoons (¼ stick) unsalted butter, melted and cooled
- ⅛ cup cocoa powder
- ⅛ cup milk
- ¼ teaspoon pure vanilla extract

Instructions:
- Preheat oven to 375 degrees. In a medium bowl, whisk together flour, cocoa powder, baking soda, and salt; set aside.
- In the bowl of an electric mixer fitted with the paddle attachment, cream together butter and sugar until light and fluffy, about 2 minutes. Add egg, milk, and vanilla, and beat until well combined. Add reserved flour mixture; mix on low speed until combined.
- Using a tablespoon or 1 ¾-inch ice cream scoop, drop dough onto ungreased baking sheets, about 2 inches apart. Bake until cookies begin to spread and become firm, 10 to 12 minutes.
- Remove baking sheets from oven, and place a marshmallow, cut-side down, in the center of each cookie, pressing down slightly. Return to oven, and continue baking until marshmallows begins to melt, 2 to 2 ½ minutes. Transfer cookies to a wire rack to cool completely before frosting.
- To make frosting: place confectioners' sugar in a medium bowl. Whisk in butter and cocoa powder. Add milk and vanilla, and whisk until well combined.
- Spread about 1 tablespoon of frosting over each marshmallow, starting in the center and continuing outward until marshmallow is covered.


As if the cookies weren't chewy enough, the marshmallow surpise and
chocolate frosting made them that much chewier!

DSC01776
"

Truffle Brownie Pumpkin Cheesecake Bites

Truffle Brownie Pumpkin Cheesecake Bites: "
Thanksgiving is around the corner, and I can honestly say, I am still a little obsessed with pumpkin. I cannot wait for pumpkin pie, I am making my pumpkin soup as I write this, and I am thinking about attempting some sort of pumpkin macaroon (have lots of egg whites on hand).

My Thanksgiving menu is already set and organized and I am not planning on adding to it. However, my kids are off from school this week and later today, we are meeting friends for a hike. Our plan is to go out for lunch after the hike, yet I knew everyone is going to end up back at our house to play for a bit. I wanted to have some snacks on hand. I whipped up these truffle brownie pumpkin cheesecake bites as I had some left over pumpkin puree in the fridge. Rather than making them in a 9x9" pan, I opted to make individuals in my silicone baking muffin pans. These are going to be the perfect compliment to a big bowl of pomegranate seeds and a white bean dip with roasted pita chips. Maybe, we will skip lunch all together and simply come home for the snacks!

Truffle Brownie + Pumpkin Cheesecake Bites
yield: 28 mini bites

ingredients:
brownies:
4 0z. unsweetened cocoa
1 stick of butter, cubed
2 Tbls. unsweetened cocoa
1 Tbls. espresso powder
1 1/2 cups sugar
1 tsp. vanilla
1/4 tsp. salt
3 eggs
1 cup flour
cheesecake
8 oz. cream cheese
1 egg
1/3 cup sugar
2 Tbls. flour
3/4 cup pumpkin puree
1/2 tsp. vanilla
1/2 tsp. cinnamon
1/4 tsp. pumpkin pie spice

instructions:
• preheat oven to 350*
for the brownie layer:
• melt chocolate, butter, cocoa, and espresso powder in a bowl over simmering water.
• remove bowl from the heat and add the sugar, vanilla, and salt. add the egg and mix until smooth.
• fold in the flour.
• using a small ice cream scoop, scoop batter into individual muffin tins. set aside while you make the cheesecake
for the cheesecake layer:
• in the bowl of a standing mixer, beat the cream cheese until smooth.
• add the sugar and combine
• add the egg and the vanilla and mix to combine
• mix in the remaining ingredients until fully incorporated.
• using the same ice cream scooper(cleaned, of course), scoop over brownie mixture and fill muffin cups almost to the top.
• using a toothpick or small skewer swirl the cheesecake mixture slightly to form a pattern with the brownie mixture.
• bake 20-25 minutes, rotating pans back to front mid through. brownie bites are done when the top of the cheesecake feels slightly firm to the touch.
• let cool on a wire rack. once cool, stick in the fridge for about 45 minutes. once totally firm, pop the brownie bites out of the muffin cups and enjoy!!


"

Tuscan Sourdough Stuffing

Tuscan Sourdough Stuffing: "

My stuffing is a labor of love. I love making the sourdough bread mixed with Tuscan and sage seasonings. Then taking that bread and making it into stuffing. I feel as though I am walking in the footsteps of cooks from years gone by. I start a few days before Thanksgiving and make my delicious rosemary bread for the stuffing. Then I cut it in to cubes and let it sit out to dry and become crusty.

My mom use to mix up her stuffing the night before Thanksgiving and then bake it the next day. She would put it in this large glass bowl that was etched with gold. She would always leave a night light in the kitchen and I would always stop and stare at that bowl of cubed bread with seasonings and always grab a piece or two before sneaking off to bed. It is not a coincidence that the first thing I ever made as a little girl was a loaf of bread. I was young and had found a recipe for Sally Lunn bread and it fascinated me. I asked my mom if I could make it. With recipe in hand I set out to make my first and rather difficult recipe. To my mom's and my amazement the bread was a huge success. I still remember to this day taking it out of the oven and the joy I felt.

So as I celebrate my thankfulness this Thursday. I will have to include in my long list, the joy of cooking. It brings me and others such joy, and it is in so many ways my expression of love to my family and others. Put your love into your cooking you never knows who is watching. It might just be the pitter patter of children who will grow up to follow in your footsteps and prepare dishes filled with their love. Happy Thanksgiving from my family to yours.


Tuscan Stuffing

  • 1 loaf of Tuscan Sourdough bread ( see below)
  • 1 stick sweet butter
  • 2 tbsp dried or fresh sage
  • Salt and pepper
  • 1/2 cup dried sour cherries
  • 1/2 cup golden raisins
  • 1 1/2 cups minced yellow onion
  • 1 cup minced celery or fennel
  • 1 cup minced carrot
  • Up to 3 cups chicken stock (or turkey if you have it)
  • 2 eggs, optional, use if you like a firmer stuffing


Directions

Preheat the oven to 350 degrees F.

Cut the sourdough into 3/4-inch squares and place in large bowl. Melt half the butter add sage.

Season with salt and pepper. Pour the sage butter over the bread and toss gently but swiftly. Spread out on 2 cooking sheets and place in the oven until light brown, about 15 minutes. Remove from the oven and place back into the bowl.

Meanwhile, place the dried fruit in a large bowl; add boiling water to cover and then set aside for at least 10 minutes. This will plump and soften the fruit for cooking. Drain fruit once plumped.

Raise the oven temperature to 375 degrees F.

Melt the remaining butter and add onion, celery, and carrot. Saute on medium-low heat until soft. Add dried fruit and remaining sage. Toss into cooled croutons. Gently toss and add chicken broth to moisten; add more broth if you like a softer stuffing. Stir in beaten eggs now, if using. Adjust salt and pepper, to your liking. Turn out into an oven-proof casserole.

Bake uncovered until golden brown on top, about 40 minutes.


Tuscan Rosemary Bread

8 ounces sourdough starter

1 cup water

3-4 cups whole wheat flour

1 tbsp dried rosemary

1 tsp Celtic sea salt

1 tbsp basil olive oil or if not available regular olive oil

Add starter and water to bowl. Slowly add other ingredients and mix until dough no longer sticks to bowl or hand about for 8 minutes. Then transfer to a greased bowl and cover. Then let rise in a draft free place till double in size for about 4 to 5 hours. Turn out dough and knead a few times to deflate. Then form into loaf and place in greased bread pan. Cover and let rise for an hour or two or until puffy and close to desired size. Then slash top of loaf and place in a preheated oven at 400º for 20 minutes then turn down heat to 350º and bake 20 minutes more or until brown and firm.Thoroughly cool bread on a rack before slicing.


"

Carrot Souffle with The Wicked Noodle

Carrot Souffle with The Wicked Noodle: "

Carrot SouffleKristy Bernardo is the funny, charming voice behind The Wicked Noodle, a blog devoted to documenting her quest to feed her family delicious food. Kristy only began to cook seven years ago when she quit her corporate job to stay at home with her first child. Ever since then she’s been teaching herself all sorts of great recipes and techniques and, lucky for us, shares them with her readers each week. Today Kristy is sharing her amazing recipe for Carrot Souffle with The Family Kitchen. It is a fabulous recipe that is completely kid-friendly and would be a hit at any Thanksgiving feast.


Kristy: Six years ago I hosted my very first holiday dinner. It was important to me to host that year – my husband and I had just built a new house and our first daughter would be four months old, and I was eager to test out my new cooking skills. I’d begun the process of teaching myself to cook just six months before and I wanted to see just how far I’d come.


I scoured every cooking magazine I could find looking for the perfect way to do everything, from cooking a moist, tender turkey down to an impressive dessert. And of course, I needed to find some amazing side dishes.


The dinner turned out better than I could have hoped. But to be honest, mostly what I remember from that first dinner is the one dish that not only outshined the rest, but it’s also the only dish that’s showed up our table every holiday dinner since.


This side dish has it all. It’s absolutely delicious with a silky texture and vibrant color. It appeals to everyone from grown-ups to the smallest children, plus it’s easy to make and holds well if the rest of your meal needs a bit more time. The best part? It’s actually good for you even though it’s practically a dessert!


The dish I’m talking about is a carrot soufflé. I’ve served this dish countless times and I’m always asked for the recipe. One of my neighbors now serves it at her table every holiday, and a friend of mine from the other side of the country just made it for his dinner party where “everyone raved”. I’m a personal chef now, and the first time I made this for my clients they deemed it one of their all time favorite dishes!


The Wicked Noodle’s Carrot Souffle


7 cups chopped carrots (about 2 pounds)


2/3 cup sugar


1/4 cup sour cream


3 tablespoons flour


2 tablespoons butter, melted


1 teaspoon baking powder


1 teaspoon vanilla extract


1/4 teaspoon salt


3 large eggs, lightly beaten


1 teaspoon powdered sugar


cooking spray


1. Preheat the oven to 350ºF.


2. In a pot of boiling water cook the carrots until tender enough to be speared with a fork. Then place them in a food processor and pulse until completely smooth.


3. Add the sugar, sour cream, flour, butter, baking powder, vanilla extract, salt and eggs to the processor and pulse to combine.


4. Coat a 2 quart baking dish with cooking spray and spoon in the mixture. Bake for 40 minutes or until puffed and set in the center.


5. When the souffle has completely cooled sprinkle it with powdered sugar and serve immediately.


I hope you try this dish for your own holiday dinner this year. I guarantee it will become one of your favorites, too!

"

An Alternative to Cranberry Sauce or Relish: Cranberry Ketchup

An Alternative to Cranberry Sauce or Relish: Cranberry Ketchup: "

cranberry sauce, cranberry relishI adore cranberry sauce and cranberry relish – and not only at Thanksgiving – but sometimes want something more complex. More than just sweetness, this chutney-esque ketchup is cranberry sauce for grown-ups; rather than just sit there being sweet and jiggly, the onions, ginger and vinegar add far more depth of flavor. It’s an easy recipe – all you do is toss everything into a pot and cook until soft and thick – pureeing it until smooth (use a food processor or hand-held immersion blender) makes it resemble real ketchup, but if you’d like to leave it chunky and call it chutney, it’s still delicious.


Cranberry ketchup also makes a great gift; preserve it in jars or decorative glass bottles and tie with a bow; it freezes well, and keeps in the fridge for weeks, so you can make it ahead of the big feast.


Cranberry Ketchup


1 medium purple onion, chopped

grated zest and juice of 1 orange

1 c. apple or orange juice, or water

1 bag fresh or frozen cranberries

1/2 c. red wine vinegar

1 c. packed brown sugar

1 T. grated fresh ginger

2 cinnamon sticks, or 1/2 t. ground cinnamon

1/4 t. salt

a good grinding of black pepper


Combine all the ingredients in a largish pot set over medium heat. Cook, stirring often, until the mixture boils, the onions become soft and the cranberries pop; about 20-25 minutes.


Let it cool a bit and then transfer to a food processor or run through a food mill until smooth. If it seems too thick, add a little extra water or juice.


Pour into hot, sterilized jars and seal according to the package directions, or let it cool and transfer to plastic containers or squeeze bottles to store in the fridge for up to a week or freeze for up to 4 months. Makes 2 1/2-3 cups.


Photo credit: istockphoto/LauriPatterson

"

Saturday, November 20, 2010

the secret to a perfect frittata [5 ingredients]

the secret to a perfect frittata [5 ingredients]: "

w4 baked frittata with chickpeas & rosemary chickpea & rosemary baked frittata


So I have 2 secrets to share today.


First is that over the last few weeks I’ve become obsessed with baked frittatas. You see I’ve always been a big fan of eggs in all their forms, scrambled, boiled and especially poached. And as much as I adore frittatas, I used to cook them only very rarely.


I think this was because I always found them a little tricky. Sure they turned out OK most of the time. But I found the juggling act of trying to get the whole frittata cooked through without overbrowning, or even worse, sticking on the bottom of the pan a bit too stressful.


But a couple of weeks ago I had a bit of a revelation. I was after something quick and vegetarian for dinner. There were asparagus that needed eating up along with some wonderful eggs from my cousin’s farm. This produced a vision of a beautiful asparagus tart with the spears lined up over the top. There definitely wasn’t time for pastry, and then it hit me. Why not try a baked frittata?


So I cooked the asparagus under the grill (broiler) until they were just tender. Whisked together a couple of eggs, lined my smallest springform pan and baked it all for about 15 minutes. And the results were even better than I was hoping. Beautiful to behold, wonderfully delicious AND super simple. Win. Win. Win.


The second secret, which you’ve probably already guessed is that baking is the best and simplest way to get perfect frittatas every time. And believe me I’ve been testing the method out. In addition to my lovely asparagus, there has been a breakfast chorizo frittata, a fancy brunch of frittata with potato, sausage & truffle oil, a potato & bacon and this wonderful chickpea & rosemary number. So simple and so good.


Do you have a favourite frittata flavour combination? I’d love to hear about it in the comments.


w4 baked frittata with chickpeas & rosemary


[5 ingredients]

chickpea & rosemary baked frittata


serves 2


A frittata is just an Italian version of an omelette. Having a good frittata recipe in your repertoire is an incredibly useful idea. When you need a quick vegetarian protein hit, there are few things more satisfying.


I love this frittata with the fragrance of rosemary and the comfort of chickpeas. It’s all day dining really. Weekend breakfast or brunch? Just add hot buttered toast. Light lunch? Add a green salad. Simple supper? A generous glass of wine and you’re good to go.


4 eggs

large handful freshly grated parmesan cheese

1 can chickpeas (400g / 14oz), drained

2 sprigs rosemary, leaves picked


1. Preheat oven to 200C (400F) and place a baking tray on the middle shelf.


2. Line a 20cm (8in) springform pan with baking paper & grease generously with olive oil.


3. Whisk together lightly eggs and parmsean. Season.


4. Place chickpeas in the prepared tin. Pour over the egg mixture & scatter over the rosemary. Season.


5. Place on the preheated tray and bake until golden and puffy and the centre feels firm and springy, about 15 minutes.


___________________________________________________________


This goes without saying, but the only way Stonesoup reaches more people is if you share it, Tweet it, Like it on Facebook, link to me from your blog, and email it to your friends. THANKYOU. I really appreciate your help spreading the word about 5 ingredients.


Share


"