Making fresh pasta is simple-- making fresh colored pasta on the other hand, is a pain in the ass. The process is quite simple, but very labor intensive and lengthy. While the results are unique and beautiful, this isn't something you should attempt unless you have a whole afternoon to kill. I'm sorry if the instructions are a little bit unclear, but I hope the pictures help. You've been warned.
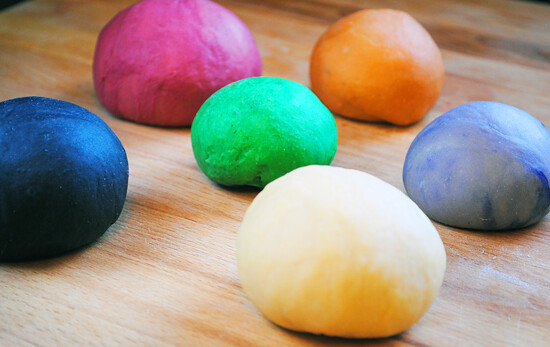
For my colored pasta, I used natural foods to color the pasta dough. The technique involves taking a vegetable or fruit that is rich in color, boiling it and pureeing it, to extract the color you want.
The ratio of water to fruit that I used was 2 to 1. For every cup of vegetable, I added 2 cups of water that were used to boil them, until they were tender enough to be pureed. I also added 1 clove of garlic, salt and pepper, for extra flavor.
For the recipe below, you will only need approximately 6 oz of puree (in total). So you really don't need that much of each color.

For orange, I used 2 varieties: one is a roasted red pepper puree, and the other one is a butternut squash puree.
For blue, I used purple potatoes-- again, they were boiled, and pureed.
For fuchsia, I used beets-- be careful, these guys stain everything they touch.
For black, I used squid ink and flour.
For green, I used spinach.
I've heard of people adding chocolate, blueberries, and tomatoes to derive many different colors. It all depends on what colors you're looking for.
Pasta:
2 cups semolina flour
2 cups unbleached all-purpose flour or '00' flour
4 large eggs
1 tsp. extra-virgin olive oil
1 tsp. extra-virgin olive oil
(this entire recipe will require ~ 6oz of puree)
1 tsp salt
+ 1 cups unbleached all-purpose flour for dusting
Directions:
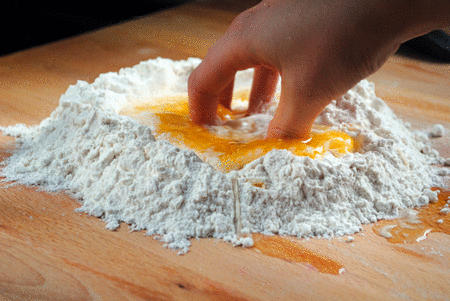
1. Make sure you have a clean work surface. Using your flour, create a 'well' directly onto your work surface (think volcano).
2. Pour in the eggs, olive oil, vegetable puree and salt. Staying in the center, begin mixing the eggs with a fork. Once your egg yolks have been broken, use your hands to slowly incorporate flour, and mix until fully incorporated. The dough will start to stiffen, and come together.
3. Set the dough ball aside, and wash and dry your work surface as well as your hands. Lightly flour your clean work surface, and knead the dough until smooth and workable. It will be slightly firm, but it shouldn't be too dry, nor too wet. If you find that the dough is too sticky, add a little bit more flour. If you find that your dough is too dry, wet your hands a little bit, and knead some more.
* roll the dough into a ball. When you poke it, it should feel tacky, but not sticky (think play-doh)
4. Loosely wrap the dough in plastic wrap, and refrigerate for 45 minutes.
5. You don't need a pasta machine, but it makes your life a little bit easier. You can always use a rolling pin, and a lot of elbow grease.
6. Divide your dough into 4 equal portions, working on one at a time, leaving the rest covered in the fridge. Flatten the piece of dough with your hand into a disk and run it through the widest setting on the machine twice. Slowly, move the rollers to the next narrow setting, until your pasta is 1/16' thick.

If you want to create different colored lines, run your pasta until it is 1/16' thick. Do this to all of your colors.
Pick one color that will act as the base. Think of it as your canvas to which you will lay down other lines in patterns. Cut thin lines of your other color doughs, and lay them on your base sheet, pressing the lines down firmly into the dough. Once you have your pattern laid out, run the pasta base through the pasta machine (or roll it) a couple more times, until all the patterns are uniform and evenly pressed into the pasta. The thinner your lines, the more fine they will appear.
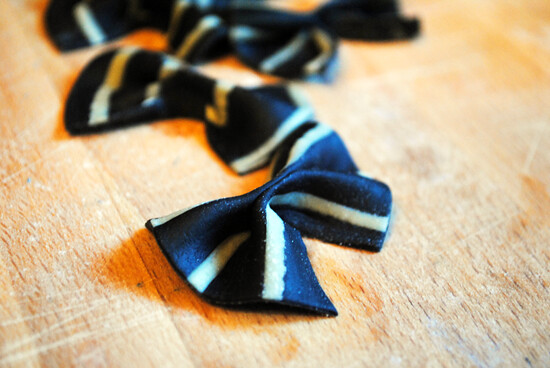
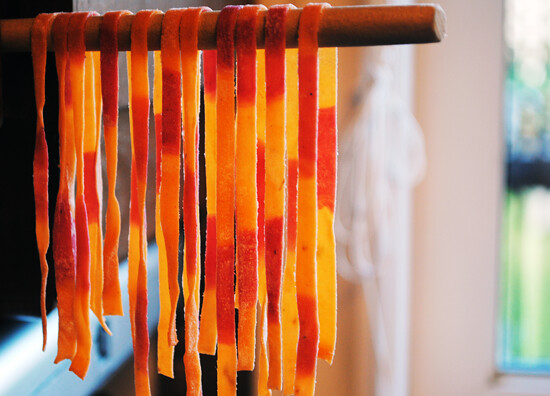
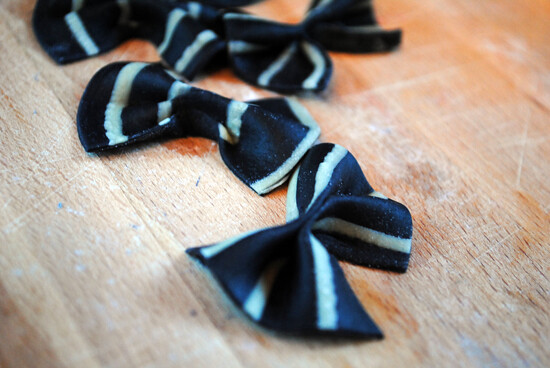
You can cut your final pasta sheet into linguini cuts, or attempt to make bow ties.
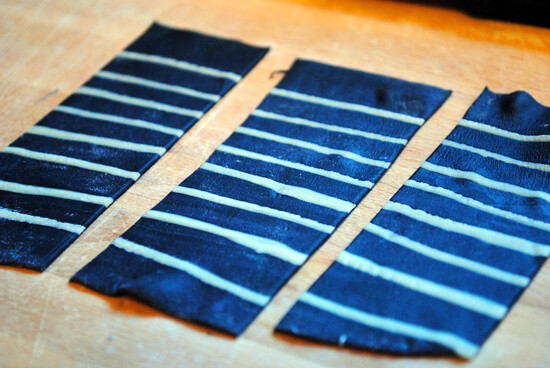
It's a little tough at first, but then you start to get the hang of it. Below, I have my squid ink pasta base, with regular pasta strips laid out on top.

I then ran it through the pasta machine to press the pasta into one another. Starting to get the hang of it?
For the bowties, cut 1'x2' rectangles, and using your thumb and index finger, bunch in the center and squeeze firmly.
Here are some helpful videos:
No comments:
Post a Comment